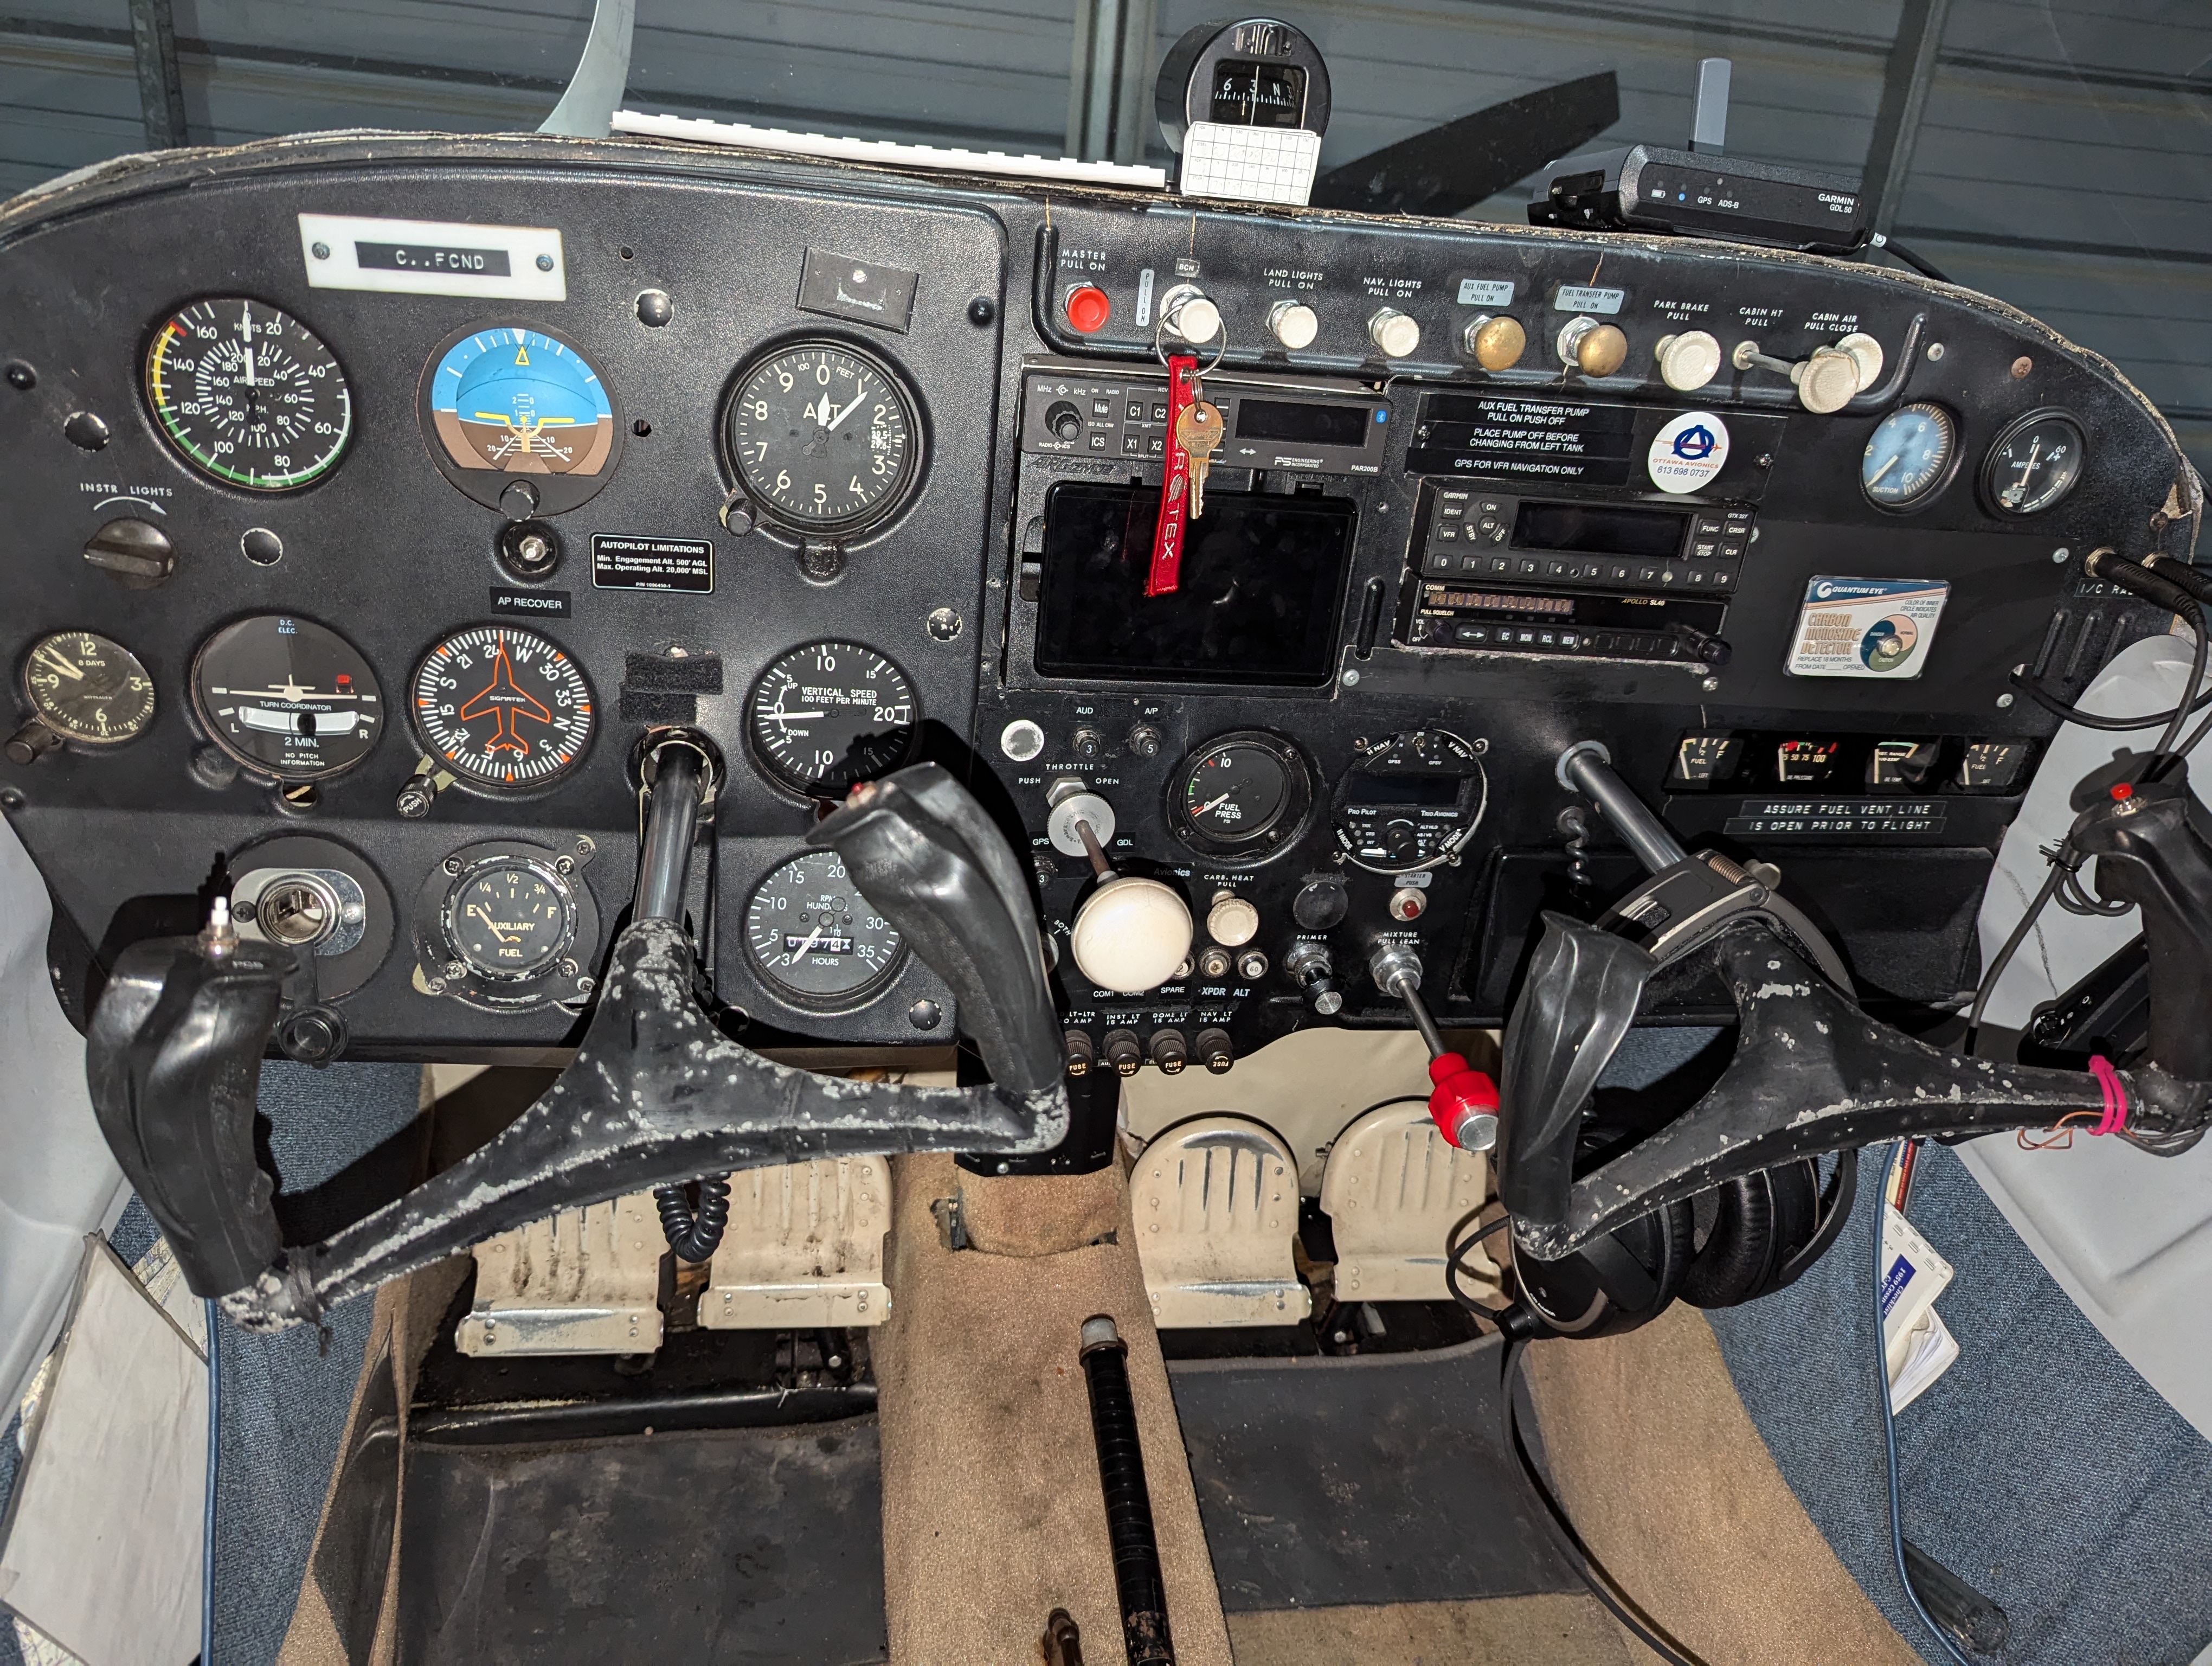
1959 Cessna 175 C-FCND
Quick Reference
MTOW: 2350 lb
Empty Weight: 1465 lb
Wing Fuel Capacity: 52 Gallons (312 lbs 100LL), 43 Gallons Usable
Aux Fuel Capacity: 18 Gallons (TBC) (108 lbs 100LL)
Full Wing Fuel Payload: 573 lbs
Full Fuel Payload: 465 lbs
Vso = 46 - 49 kts (53 - 56 mph) (20 - 40 deg flaps)
Vs = 52 kts (60 mph)
Vr = 61 kts (70 mph)
V best glide = 61 kts (70 mph)
Vx = 61 mph (no flaps) to 60 mph (52 kts) (20 deg flaps)
Vy (@ S.L.): 65 kts (75 mph) (1700 lbs) to 73 kts (84 mph) (2350 lbs)
V Approach = 56 - 65 kts (65 - 75 mph) (flaps)
Vref (1.17 Vso - 1.3 Vso) = 54 - 60 kts (62 - 69 mph)
Max Flaps Extended Speed = 87 kts (100 mph)
Va (Maneuvering Speed) = 107 kts (123 mph)
Vne (Never Exceed Speed) = 153 kts (176 mph)
Flap Range (White Arc): 46 - 87 kts (53 - 100 mph)
Normal Range (Level or Climb) (Green Arc): 54 - 122 kts (62 - 140 mph)
Caution Range (Level or Climb) (Yellow Arc): 122 - 153 kts (140 - 176 mph)
Maximum (Glide or Dive, Smooth Air) (Red Line) = 153 kts (176 mph)
Checklists
PREFLIGHT
- R. Fuel Drain – Sump
- R. Fuel Level – Check
- L. Fuel Drain – Sump
- L. Fuel Level – Check
- 2 Belly Fuel Strainers – Drain
- Oil Level – Check (6-8 qts)
- Docs/Squawks – ARROW/VOR
- Control locks – Remove
- Fuel Selector – Both
- Ignition Switch – Off
- Avionics Master – Off
- Master Switch – On
- Fuel Qty & Pump – Check
- Lights – Check and Off
- Tach Time – Note
- Master Switch – Off
- Flaps – Down
- L. Fuselage – Check
- Antennas – Check
- Tail Surfaces – Check
- L. Elevator – Check
- Actuator Cables – Check
- Rudder Bolts – Check
- Tail Tiedown – Remove
- Trim Actuator – Check
- R. Elevator – Check
- R. Fuselage – Check
- R. Flap – Check
- R. Aileron – Check
- R. Wing – Check
- R. Wing Tiedown – Remove
- R. Gear/Tire/Brake – Check
- Prop – Clear, no Damage/Leaks
- Alternator Belt – Check
- Nose Strut – Check 3"
- Static Port – Clear
- L. Wing – Check
- Stall Warning – Check
- Fuel Vent – Clear
- Pitot Tube – Clear
- L. Wing Tiedown – Remove
- L. Aileron – Check
- L. Flap – Check
- L. Gear/Tire/Brake – Check
- Flaps – Up
BEFORE START
- Preflight – Complete
- Tiedowns/Cowling Towbar – Removed
- Fuel Caps – Double Checked
- Passenger Briefing – Complete
- Carbon Monoxide Detector – Check
- Seat/Seatbelts – Secure
- Brakes – Set
- Key – In Ignition
STARTING ENGINE
- Fuel Selector – Both
- Avionics – Off
- Circuit Breakers – In
- Mixture – Rich
- Carb Heat – Cold
- Prime – 2-4 Strokes or Throttle
- Throttle – Open 1/4"
- Beacon Light – On
- Master Switch – On
- Prop Area – Clear
- Ignition Switch – Both
- Starter – Engage
- Throttle – 800-1200 RPM
- Oil Pressure – 25-95 PSI
- Mixture – Ground Lean
- Avionics Master/Radios – On
- Weather – Check
- Transponder – Set
- Lights – As Required
TAXI
- Brakes – Check
- Flight Controls – Set for Wind
RUNUP
- Brakes – Set
- Cabin Doors – Closed
- Flight Controls – Free & Correct
- Flight Instruments – Check/Set
- Mixture – Rich, or Lean & Smooth
- Throttle – 1700 RPM
- Oil Pressure – Check
- Suction Gauge – Green
- Ammeter – Charging
- Carb Heat – Check for RPM Drop
- Mags – Max 175 RPM Drop
- Throttle – 1000 RPM
- Oil Temp – >100
- Radios/Avionics – Set
- Departure Plan – Review
- Flaps – 0° or 20° Short/Soft Field
FOULED SPARK PLUG PROCEDURE
- Throttle – At least 50% Power
- Mixture – Lean until Engine Roughness Begins
- Time – 1-2 Minutes
- Mixture – Halfway Back to Full Rich
- Ignition Switch – Check L & R
- Repeat if Needed, Note Which Ignition Side is Rough
- Throttle – Idle
- Proceed to Takeoff Checklist or Return to Hangar
TAKEOFF
- Trim – Set for Takeoff
- Mixture – Rich or lean >4000'
- Landing Lights – On
- Fuel Pump – On
- Time – Note
- Throttle – Idle
- Proceed to Takeoff checklist or Return to hangar
TAKEOFF
- Unmarked V Speeds in MPH:
- V70
- Vx 61 with 20° Flaps
- Vy 84
- V123
- Best Glide 70
- Trim – Set for Takeoff
- Mixture – Rich or Lean ≤4,000'
- Landing Lights – On
- Fuel Pump – On
- Time – Note
CLIMB
- Flaps – Up above obstacles
- Airspeed – 90 MPH
- Power – Full
- Fuel Pump – Off
- Mixture – Lean <4000', CHT <400
CRUISE
- Pitch – Level
- RPM – 2350–2700 RPM
- Trim – Set
- Mixture – Lean, CHTs <400
- Lights – As Required
- Engine Instruments – Check/Monitor
DESCENT
- Destination Weather – Check
- Throttle – As Required
BEFORE LANDING
- Seat Belts – On
- Fuel Selector – Both
- Mixture – Rich
- Fuel Pump – On
- Throttle – As Required
- Carb Heat – On
- Prop – Check RPM not in Red
- Mixture – Enrich as Required
- Landing Lights – On
GO-AROUND
- Throttle – Smoothly Full Forward
- Carb Heat – Cold
- Flaps – Retract slowly with Airspeed increase
AFTER LANDING
- Flaps – Up
- Carb Heat – Cold
- Mixture – Ground Lean
- Fuel Pump – Off
- Lights – As Required
- Radios – Set
- Transponder – Check
Approach Speeds (max gross weight):
- Flaps 0–20° – 70–80 MPH
- Flaps 30–40° – 63–70 MPH
Emergeny Procedures
Electrical Fire in Flight
- Master Switch – Off
- Avionics Master Switch – Off
- Electrical Switches – Off
- Vents/Cabin Air – Closed/Off
- Fire Extinguisher – Activate
- Cabin – Ventilate
- If fire is out and power is needed...
Engine Fire During Start
- Cranking – Continue with starter engaged
- If engine starts:
- Throttle – 1700 RPM for 3 minutes
- Engine – Shutdown/Inspect
- If engine fails to start:
- Throttle – Full Open
- Mixture – Idle Cutoff
- Cranking – Continue
- Fire Extinguisher – Obtain
- Master Switch – Off
- Ignition Switch – Off
- Fuel Selector – Off
- Fire – Extinguish
- Fire Damage – Inspect
Wing Fire
- Landing Lights – Off
- Navigation Lights – Off
- Perform Sideslip to keep flames away from fuel
- Land As Soon As Possible
Cabin Fire
- Master Switch – Off
- Vents/Cabin Air – Closed/Off
- Fire Extinguisher – Activate
- Cabin – Ventilate
- Land As Soon As Possible
Precautionary Landing w/ Engine
- Seats/Seatbelts – Secure
- Flaps – 20°
- Airspeed – 65–70 MPH
- Landing Site – Overfly & Assess
- Electrical Switches – Off
- Avionics Master – Off
- Master Switch – Off
- Flaps – 30–40° on Final Approach
- Doors – Unlatch
- Touchdown – Nose High
- Ignition Key – Off
- Brakes – Apply Heavily
Emergency Landing w/o Engine:
- Radio – “MAYDAY” on ATC or 121.5
- Transponder – 7700
- Airspeed – 70 MPH Flaps UP
- 60 MPH Flaps DOWN
- Mixture – Idle Cutoff
- Fuel Selector – Off
- Ignition Switch – Off
- Flaps – As Required
- Master Switch – Off
- Doors – Unlatch
- Touchdown – Tail Low
- Brakes – Apply Heavily
Engine Fire During Flight:
- Mixture – Idle Cutoff
- Fuel Selector – Off
- Master Switch – Off
- Cabin Heat/Air – Off
- Airspeed – 110 MPH or more
- Master Landing – Execute
Emergency Frequency:
- 121.5
- Emergency Transponder Code – 7700
- Radio Failure/Transponder Code – 7600
Carbon Monoxide Detector Alarm
- Shut off (push) cabin heat
- Shut off (pull) cabin air knob on panel
- Open wing root vents
- Open window in left cabin door
Ammeter Shows Excessive Charge
- Alternator CB – Pull
- Nonessential Electrical Equip – Off
- Land As Soon As Practical
Ammeter Shows Excessive Discharge
- Avionics Master – Off
- Alternator CB – Check In
- Master Switch – Off
- Master Switch – On
- Ammeter – Check if Charging
- Avionics Master – On
- If Discharge continues:
- Non-essential Elec Equip – Off
- Land As Soon As Practical
POH
C175 POH
Avionics
Navigation
Garmin Aera 660
Trio Avionics Pro Pilot Autopilot
Basic operation notes:
- Test procedures
Runup:
Turn on, set current baro altitude (already adjusted for conditions), single press encore
Engage servos,
check autopilot on,
check if autopilot centres for roll,
check if centres for pitch,
then turn it offf and verify full control adn no resistance,
turn it back on,
onfirm can fight/overcome autopilot,
turn it off with pcs button,
back on and power button,
back on and and circuit breaker?? optional
Pilot controlled steering
Auto recover
Various functionality:
Rotate encoder on main startup page to see various fields sent by GPS (GS, ETE, etc.)
Press V MODE or H MODE buttons to change what the encoder will control parameters for
- Horizontal: TRK (track flight plan)
- Ensure clear of airport area
- With flt plan already entered, engage H NAV button to engage horizontal (aileron) servos
- Proppilot will fly to flt plan course line
- HMODe, XTK is crosstrack to offset track with encoder
- Horizontal: CRS (course)
- Once engaged horizontally as described above
- Select H MODE to set selection to CRS
- Flies magnetic course
- Select course to fly by rotating encore knob to enter desired course
- To return to track mode, set to intercept and it will automatically change to track mode when intercepted
- Vertical: ALT HLD (alttiude hold)
- Engage V NAV button to engage vertical (elevator) servos
- Pressing the V MODE/VNAV button will activate the altitude hold (better to do once trimmed at alttiude)
- If not properly trimmed, display will alert to trim in proper direction
- turn encoreder to hange alt b around 5 ft or so usually when new baro alttiude, or double long press to start slow VS change
Communication
PS Engineering PAR200B Audio Selector Panel, High-fidelity Stereo Intercom System, VHF Communications Transceiver Controller
Garmin SL40 VHF Comm
Surveillance
Garmin GTX327 Transponder
Systems
Aux Fuel Tank
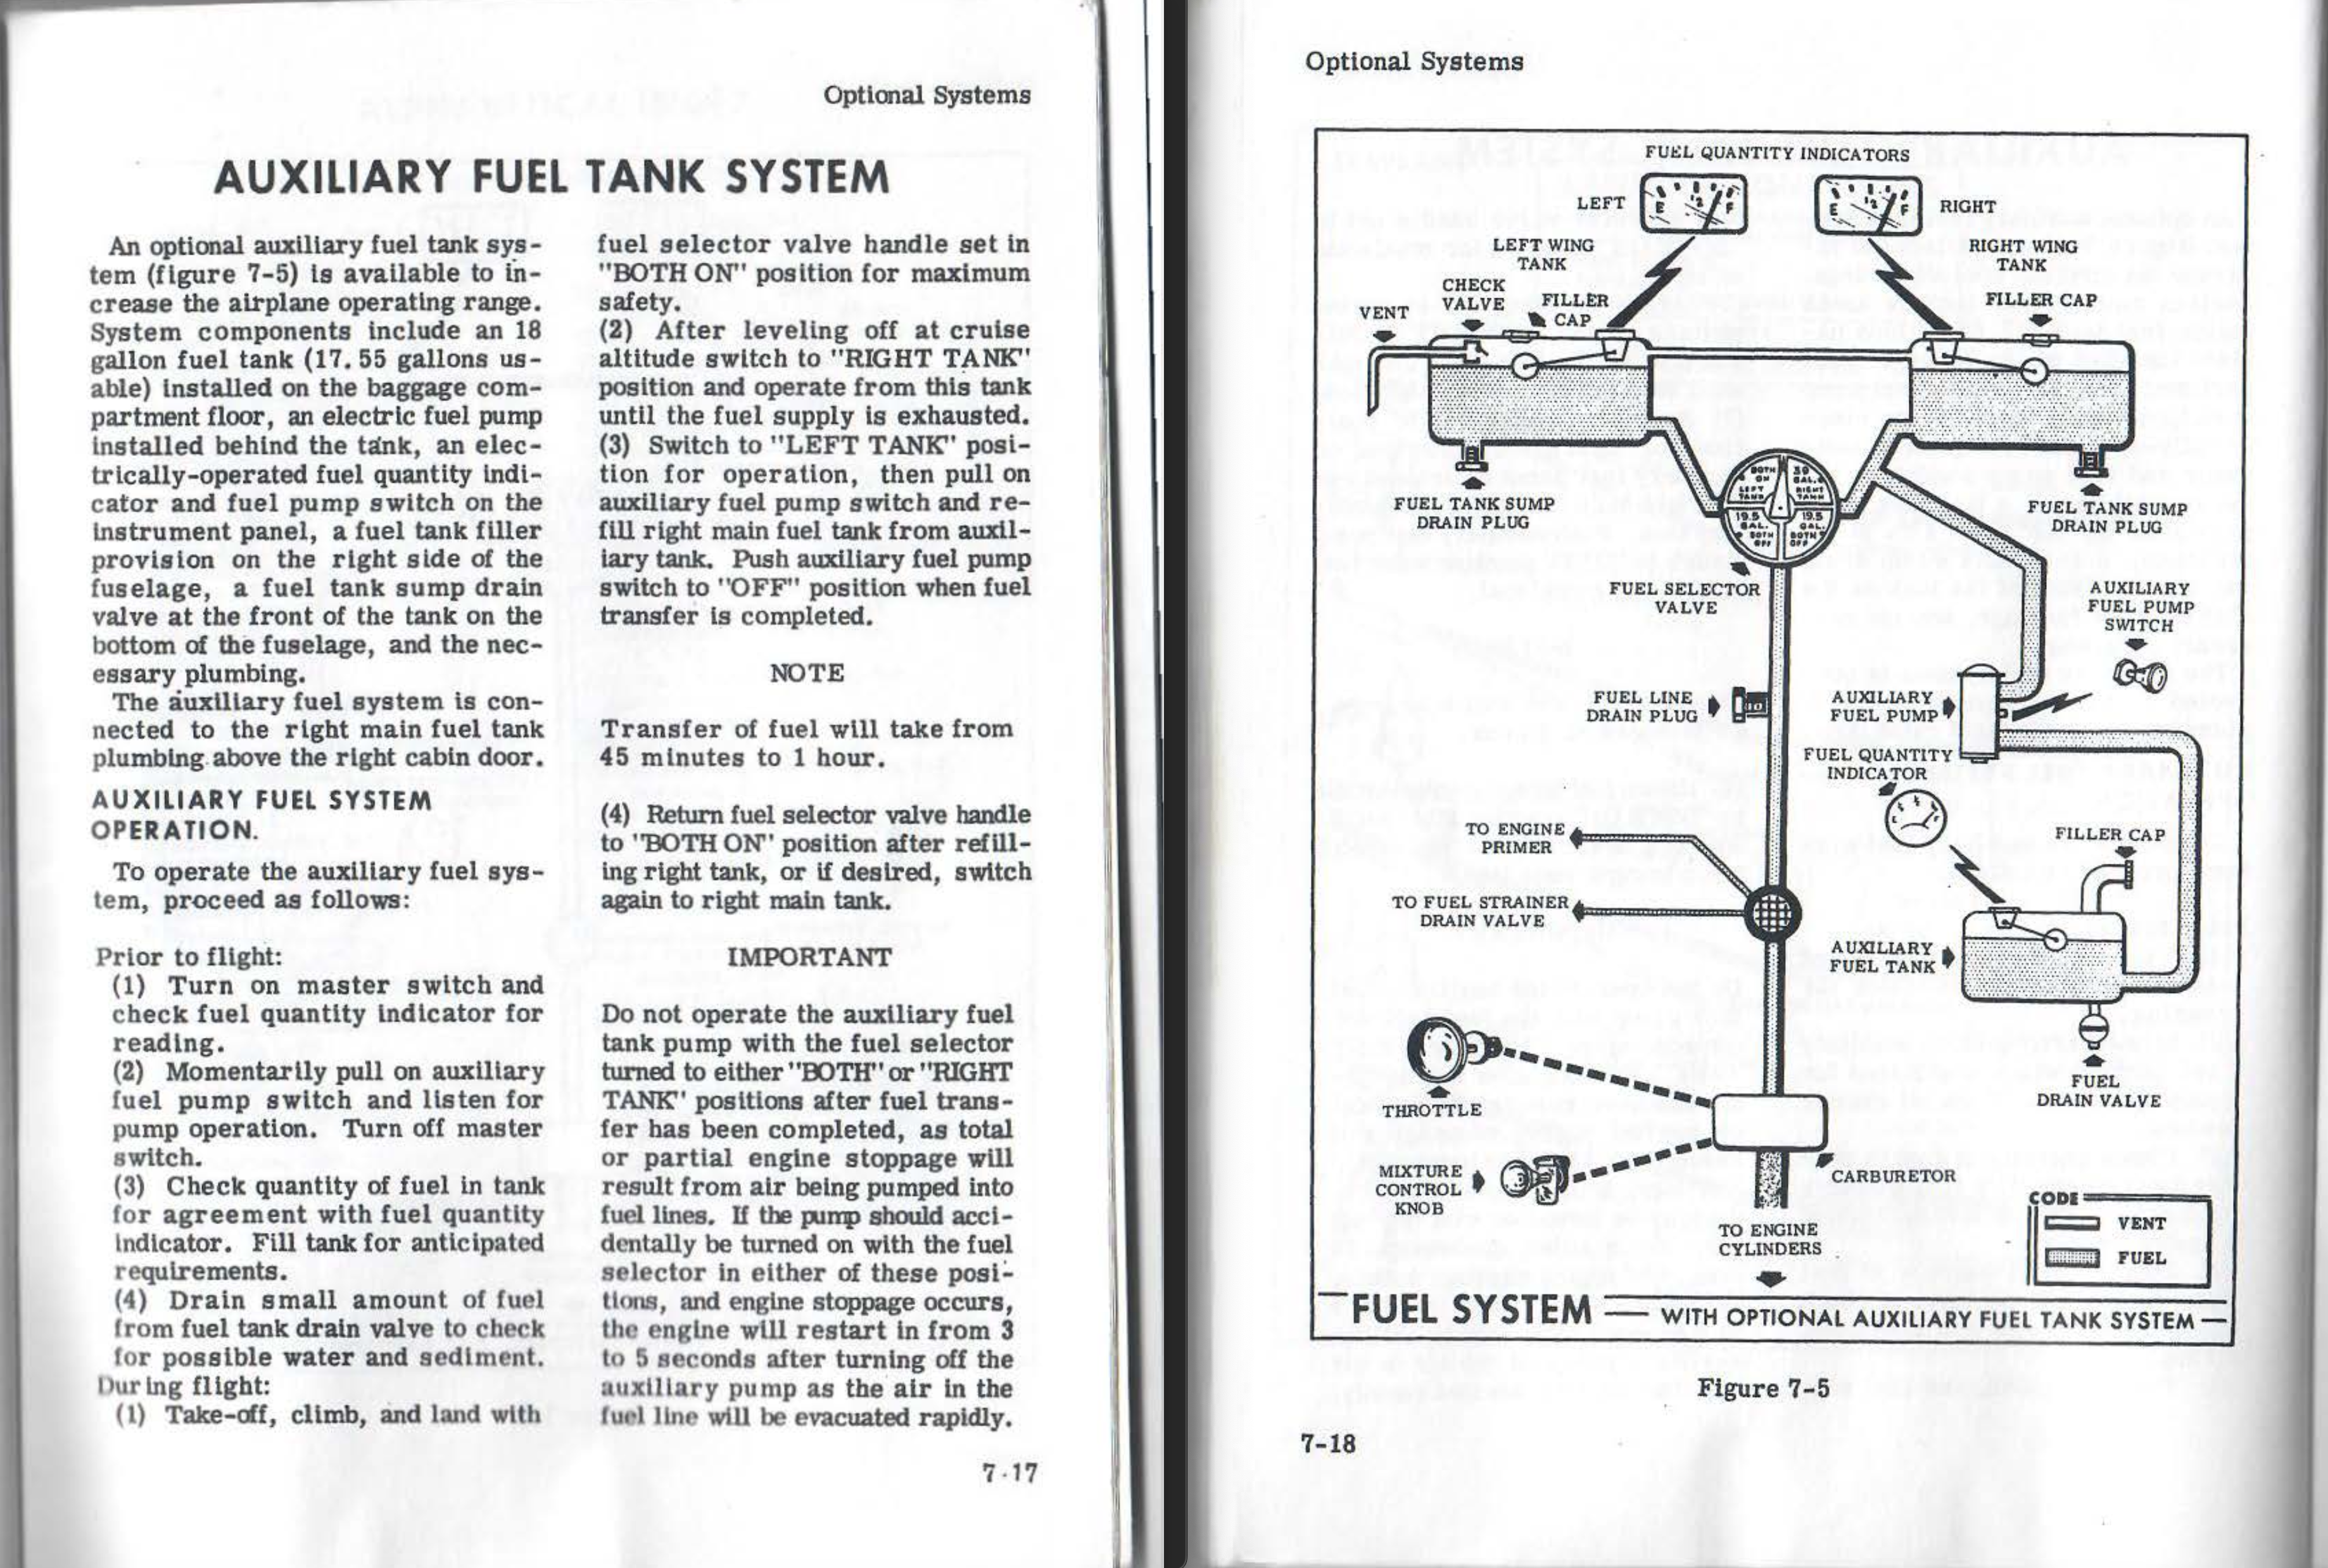
Unclear if it's stock (because no baggage door and was at one point a factory option for other Cessnas) or add on/STC (closest I found was http://www.griggsaircraft.com/fabrication/aux_fuel_systems but no C175 and slight details don't match)
Cessna Aux Fuel Tank
Placard reads: "Place pump OFF before changing FROM LEFT tank"
- Takeoff, climb, and land with fuel selector valve handle set in "BOTH ON" position
- At cruise altitude, switch to "RIGHT TANK" position and operate from this fuel tank until the fuel supply is exhausted
- Switch to "LEFT TANK" for operation
- Pull on aux fuel pump switch and refill right main fuel tank from aux fuel tank
- WATCH THE MAIN TANK FUEL LEVEL CLOSELY, DO NOT OVERFILL
- Push aux fuel pump switch to "OFF" when fuel transfer is completed (transfer of fuel will take 45-60 minutes TBC!!!)
- DO NOT OPERATE THE AUX FUEL PUMP WITH THE FUEL SELECTOR ON "BOTH" OR "RIGHT" AFTER FUEL TRANSFER HAS BEEN COMPLETED - ENGINE STOPPAGE WILL OCCUR, IF IT HAPPENS SWITCH PUMP OFF AND WAIT 3-5 SECONDS
- Return fuel selector valve handle to "BOTH ON" or even "RIGHT" position after refilling the right tank and shutting off the aux fuel pump
Cockpit